There are many ways to demonstrate E-E-A-T to Google. Schema is one of them.
For many of the strategies relating to schema, EEAT, author and company validation, it comes down to how we’re setting up Rank Math. So, I thought I’d send out a tutorial that explains exactly how we set up Rank Math Pro.
Don’t have Rank Math Pro? I totally get it. I rarely pay for paid plugins. I do think this one is worth it, because it makes a lot of things easier for a pretty low cost.
Ok, let’s get into it.
Quick Navigation
What Is Website Schema?
There are a ton of great articles out there on schema, so I’ll let you read up on it if you want. It is a type of Structure Data that you can add to your website to help search engines better understand what each page (and its entities) is about.
Most SEO plugins (Yoast, Rank Math, etc) give you basic schema options like:
- Article
- Recipe
- Video
- FAQ
First and foremost, you want to make sure you’re including this on all of your applicable pages. But, you can go a lot further, and that’s what I want to dive into today.
I use Rank Math Pro for all of this. No, they’re not the only game in town, and they’re not perfect. But I like them the best, so I’m going to show you how to do it through Rank Math.
How to Add Rank Math Schema for EEAT Signals
Using the Rank Math Pro plugin, you can easily add Advanced Schema to your website without any coding knowledge. Here’s how:
Step 1: Install and Activate the Rank Math Pro Plugin
Install and activate the Rank Math Pro plugin.

Yes you have to have both active. I always hate it when plugins require this. But, it is what it is.
Step 2: Configure Rank Math Pro Settings
After activating the Rank Math Pro plugin, you will need to configure the plugin settings to enable Advanced Schema. You can do this by clicking on the “Rank Math” menu in your WordPress dashboard and selecting “Dashboard.”
In the “Dashboard” section, you will see a toggle button to enable “Advanced Schema (Structured Data)” and “Local SEO.” Toggle both of these on.
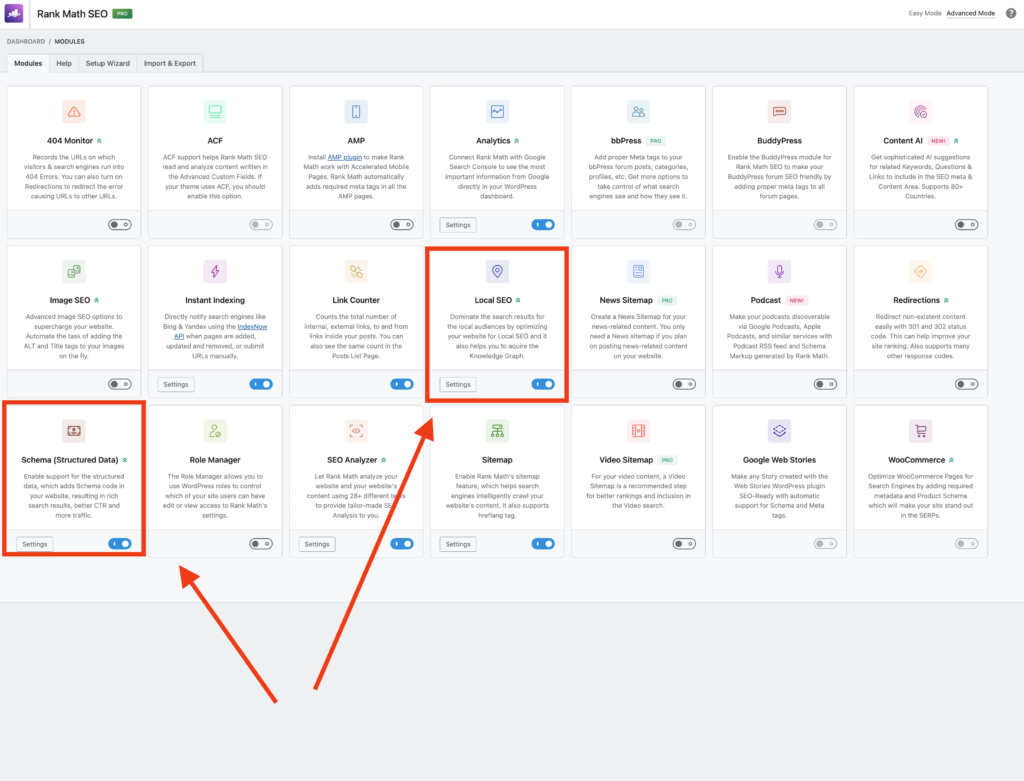
Schema (Structured Data) Section
- On the Rank Math sidebar in WordPress, click on “Titles & Meta.” Then, go to the “Posts” section on the left menu
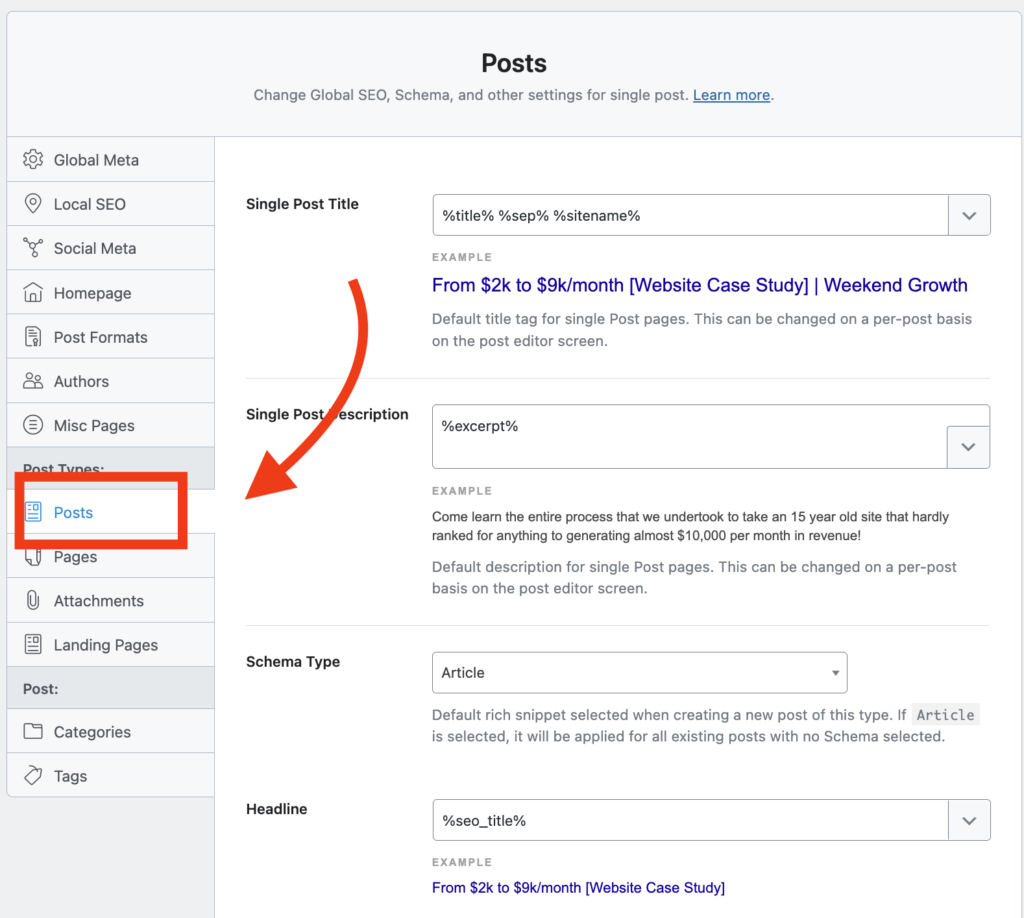
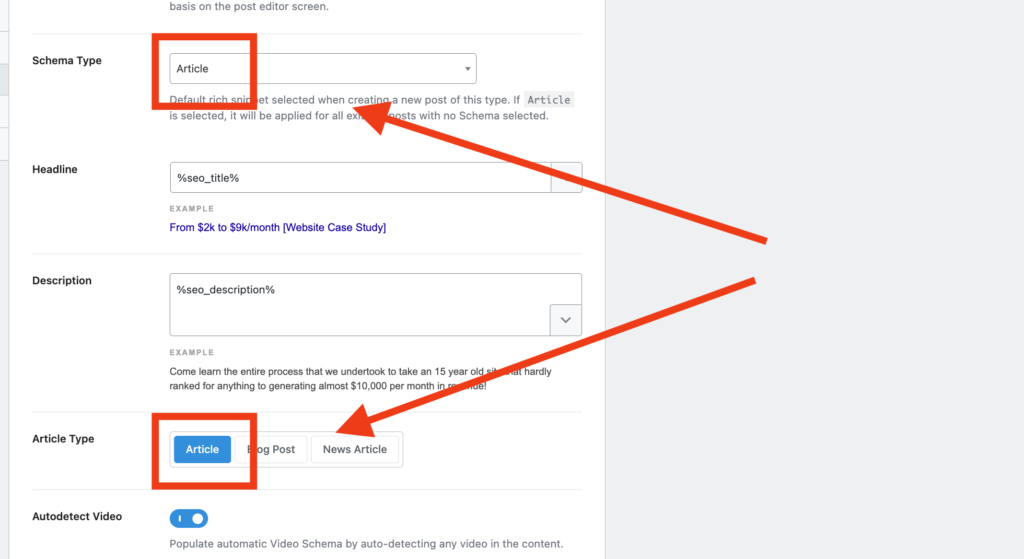
- The big things to pay attention to here are that you have Article schema set to default. For the vast majority of bloggers, this is the right default schema to have selected.
Local SEO Section
So, this is where things can get a little confusing. My first thought when I see “Local SEO” is “hey, I’m not trying to rank this site for local queries, so I can probably skip this.” Seems logical. But, that’s not what this section is for.
Instead, this is where you add local elements about your business (website) like name, address, and phone number (NAP).
And having these details embedded in your schema is a big deal now with the introduction of E-E-A-T. Google needs to know that you’re a real business, not a fly-by-night affiliate website.
Once inside the Local SEO area, fill out all of the relevant information.
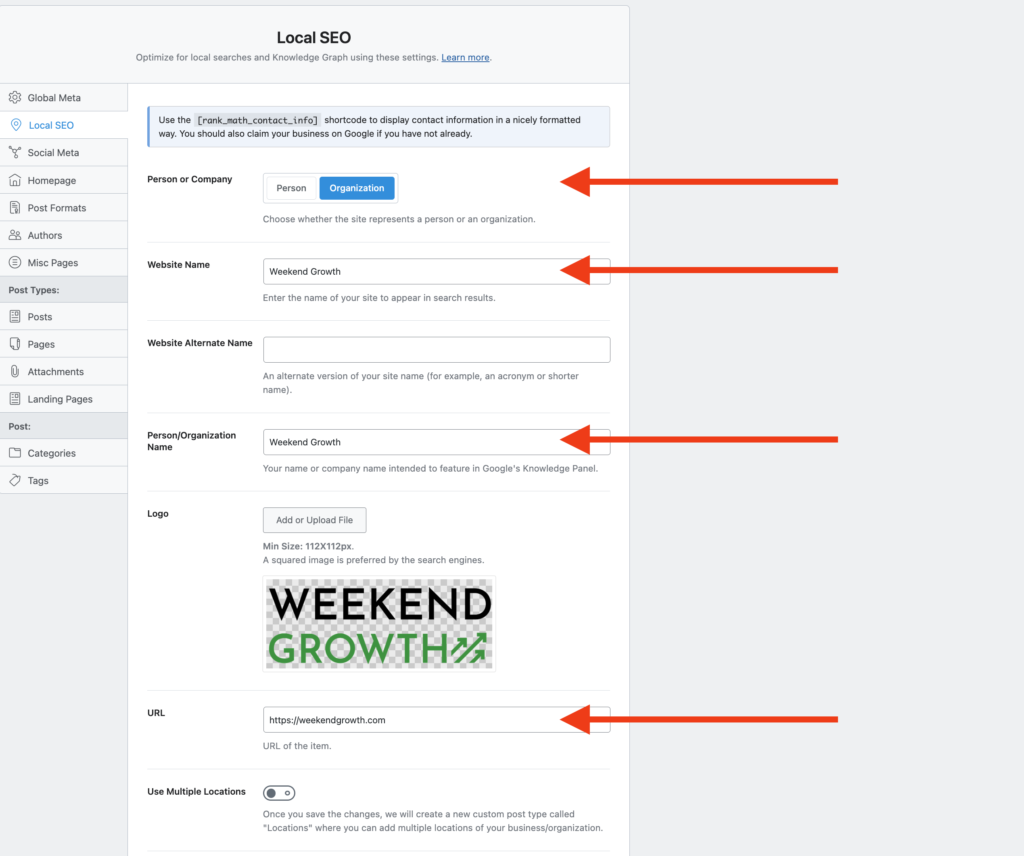
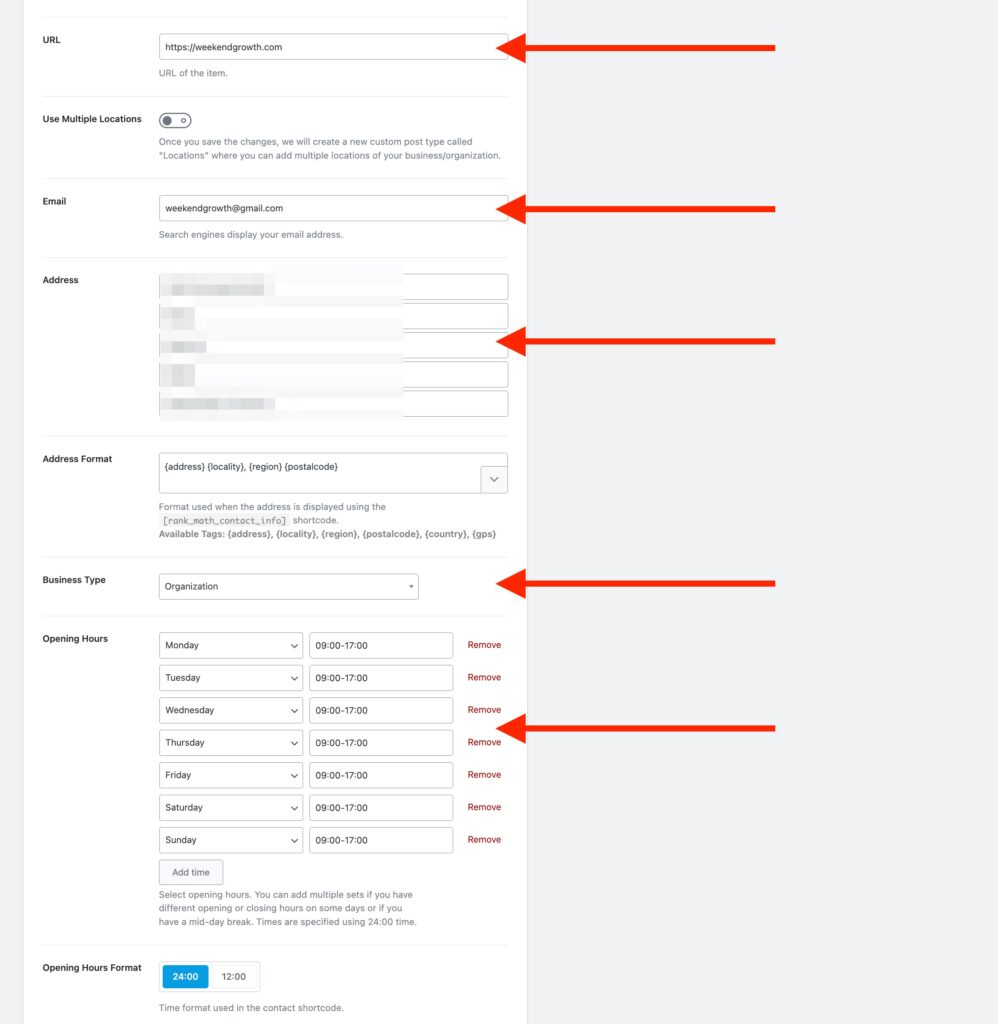
If you’re saying “wait Jared, I don’t have an address or phone number for my website”, I believe you will need one going forward. This was first outlined by Kyle Roof in my Niche Pursuits interview with him in January 2023.
In many ways, EEAT is about establishing yourself and your business as authentic and real. First, you need to get these details lined up. But then, using schema is the BEST way to show it to Google!
About Page & Contact Page Schema
Perhaps the most important part! And, this is where things get really confusing if you don’t do it right.
You’re still in the Local SEO section → go to the bottom. Here is where you want to assign your About Page and Contact Page.

Once assigned, Rank Math will automatically add the proper AboutPage Schema and ContactPage Schema to these pages.
You can’t do this on the page level, you have to do it here!
Step 3: Verify Using the Schema Structured Data Testing Tool
After adding Advanced Schema to your website using Rank Math Pro, it’s a good idea to verify that the schema markup is working correctly using Google’s Rich Results Testing Tool.
To do this, navigate to the Rich Results Testing Tool and enter the URL of the page or post you want to test. Click on “Run Test” to test the schema markup. I recommend testing all page types that you add schema to, to ensure each is set up properly (ex: home page, about page, contact page, blog post, etc).
The tool will analyze the page and display any errors or warnings related to your schema markup. If you encounter any errors or warnings, go back to the Rank Math Pro editor and make any necessary changes to the schema markup.
For the About Page and Contact Page, you’ll have to do a little digging to see it properly implemented.
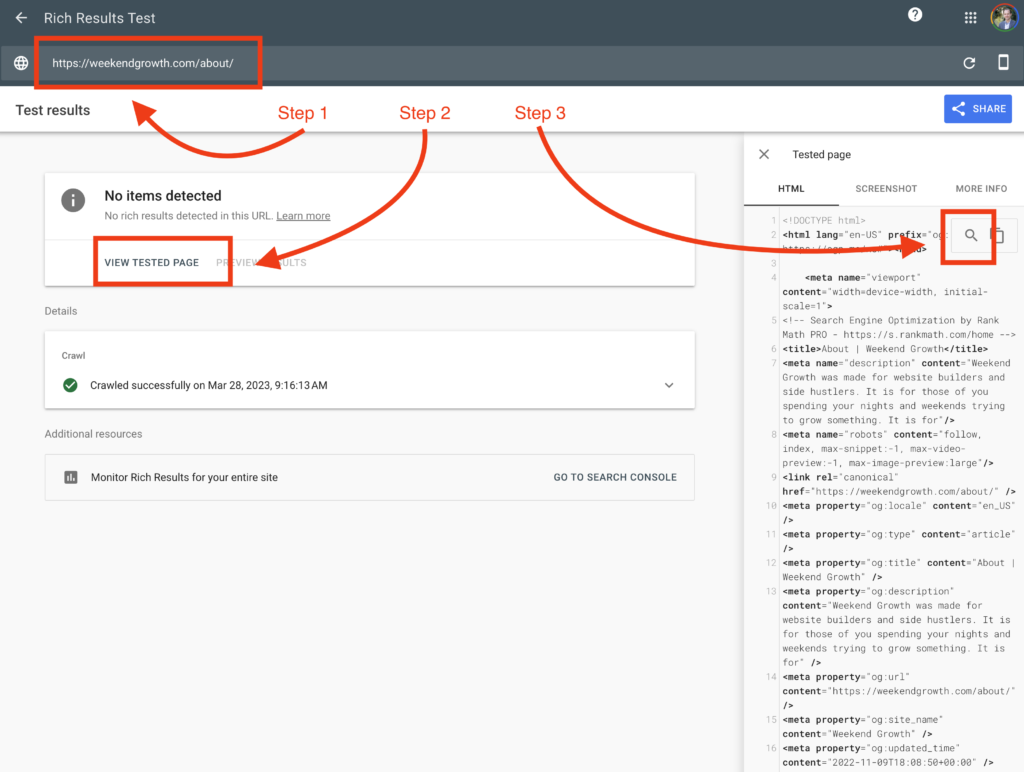
For example, here I am testing the About Page. To test:
- Plug your About Page URL into the Rich Results Testing Tool
- Click “View Tested Page”
- Click on the magnifying glass to search
- Type “AboutPage”
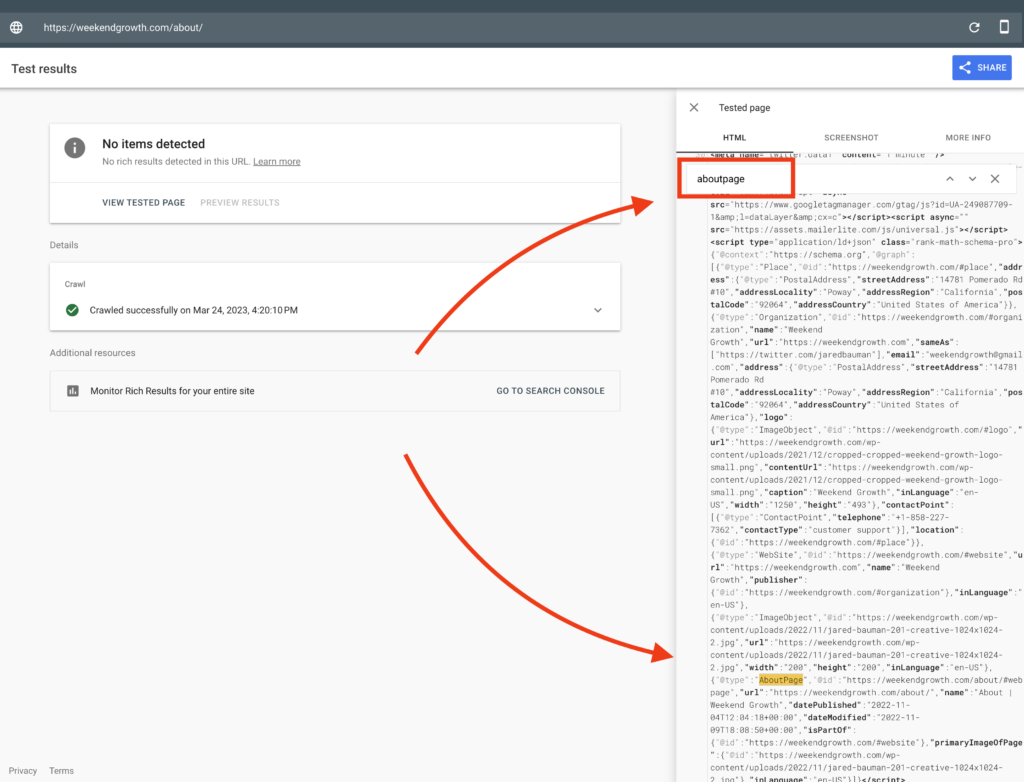
There it is! AboutPage Schema 🙂
Rich Results Test Tool vs Structured Data Test Tool
There are technically two test tools to see if you have everything implemented properly:
I prefer using the Rich Results Test, mainly because it displays what Google sees. And, that’s what matters most to me.
Wrapping Up
Ok, hopefully this article helped you see a practical way to implement E-E-A-T signals into your website using schema. I use Rank Math Pro, but the concepts remain no matter what tool you choose to use. Let me know if you have any questions!


Would love to see more info on the SameAs section
Good news, that is the topic for next week (January 17th)! Make sure you’re on the newsletter to receive!