Two years ago (mid 2021), we replaced ALL stock images on one of our websites with custom images.
It seemed like a no-brainer. Both myself and Kaitlin (biz partner) used to be pro photographers. Why are we using stock images on our website?
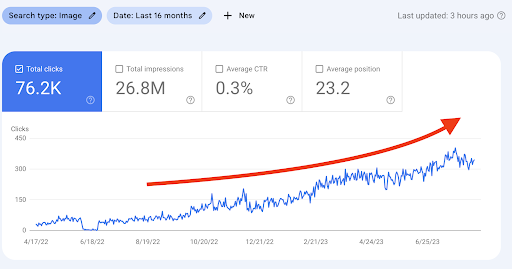
2 years later, we generate over 10,000 clicks per month from Image Search.
Perhaps even more valuable, how about all those positive E-E-A-T signals from custom images that actually get clicks?
I’m going to talk about why unique images are important in today’s online environment (you’ve heard a lot of it before.)
But I’ll also share how you can get these unique images pretty darn easily.
Why Listen to Me? I was a professional photographer (Bauman Photographers) for 12 years. I educated pro photographers at the highest level (Creative Live). I now run a marketing agency that grows and manages websites for businesses (201 Creative). I know a good amount about images and how to store them.
Why Unique Images are Important
1. Google’s E-E-A-T
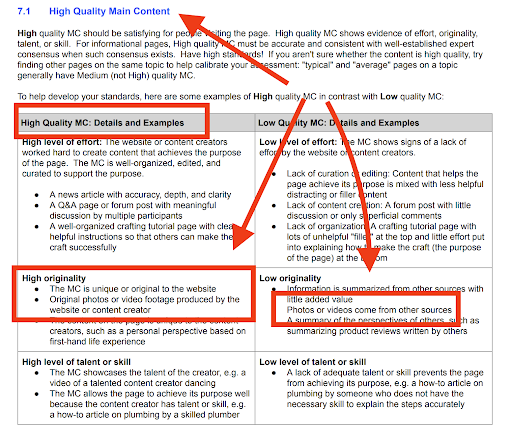
With E-E–A-T being all the rage, Google states that the goal is for all photos to enhance the usefulness of content rather than just serve a decorative purpose.
Overall, original, high-quality photos that accurately reflect the topic should be used to support expertise, authoritativeness, and trustworthiness.
Read it for yourself – Google’s Quality Rater Guidelines recommends using original, high-quality photos that accurately represent the content in order to support E-A-T.
Lets be perfectly clear – a lot goes into E-E-A-T (much of which is link based).
Taking a few custom photos is NOT going to automatically insulate your site from the other important E-E-A-T components.
Custom photos are one of MANY things you should be doing to gain trust and authority in Google’s eyes.
But, custom photos are quick, easy, and can generate traffic! And, they help E-E-A-T.
2. Product Review Update
Google has recommended that product review sites use original product photos, rather than stock images, when writing product reviews and product descriptions.
Using real images of the actual product helps build trust and confidence with potential customers. Google notes that original photos help users better evaluate the product details and quality.
They also say sites should clearly mark any images as either stock photos or original product images to avoid confusion.
Note – they didn’t say the photos have to be works of art. Just unique.
3. Increase Trust
Moving beyond what Google says…
Photos showing you (or someone) USING and DOING things related to your subject increases trust in your readers.
This leads to longer time on page, decrease in bounce rate, more conversions and purchases.
It makes sense. In a world of AI, skepticism is at an all time high. A picture is worth a thousand words. Seeing is believing.
4. Avoid Copyright Issues
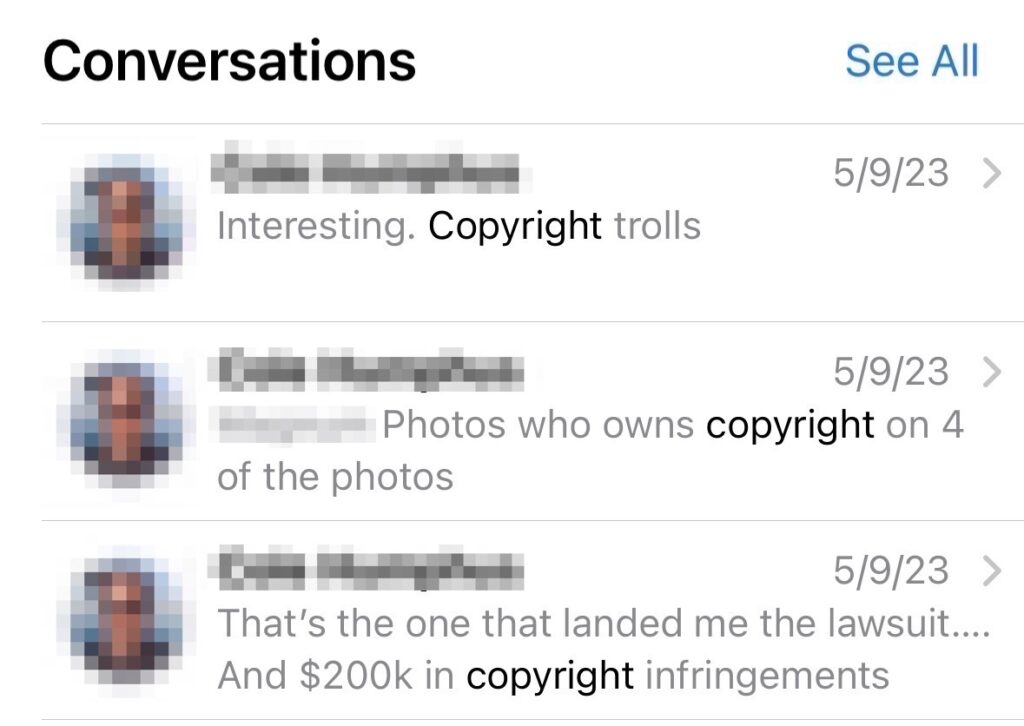
The chances are low, but there are always stories of websites that get caught up using an image that didn’t turn out to be copyright free, and getting a big lawsuit as a result of it.
A good friend of mine had it happen. Cost him 5 figures.
It’s not likely, but I can tell you that you’ll never lose a lawsuit if you take the picture yourself!
5. Build a Brand
Brands invest in unique images. If you’re building a brand, instead of just a website, unique images are important.
Nuff said on this one.
6. Drive Traffic
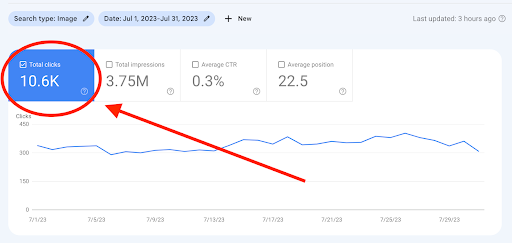
One of my website’s drives over 10,000 clicks per month from images. That’s real traffic.
For those of you about to hit “reply” and lay into me… yes, we did other things to the website as well. No need to email me about it. But, those clicks are from images. Those custom images ARE driving 10k+ clicks per month.
So, from this standpoint, it isn’t just about satisfying Google’s latest whim, or avoiding the next algo update. You can actually drive meaningful traffic!
How to Take Photos For Your Website
Let me guess… you’re not a professional photographer? Honestly, that’s not a big deal.
You don’t need pro-level photos. They just need to check the boxes. Here are some quick tips to put into action right now:
Why Listen to Me? I was a professional photographer (Bauman Photographers) for 12 years. I educated pro photographers at the highest level (Creative Live). I now run a marketing agency that grows and manages websites for businesses (201 Creative). We know a lot about how to take good images for websites.
1. Use Your Phone With These Settings
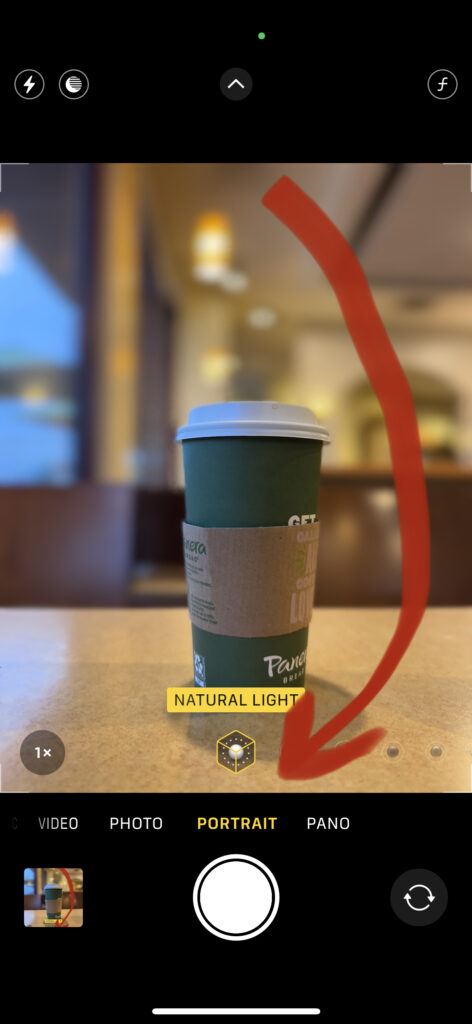
On the iPhone, shoot everything in Portrait mode. It blurs that background out, which is nicer. In the photo world, we call that “bokeh”. Pronounced boka. Now you’re cool and can use the lingo 🙂
Here is a photo of my cup of coffee, taken just now from the coffee shop I’m working in. Portrait mode:
2. Take Advantage of Good Lighting
Bright, even light is all you need. Avoid the shadows, don’t shoot at night. Cloudy days are perfect.
When I say “bright,” I really just mean daylight.
Also, avoid using the flash on your phone. Sure, it “brightens” up the photo, but it doesn’t look great – it gives it an artificial look.
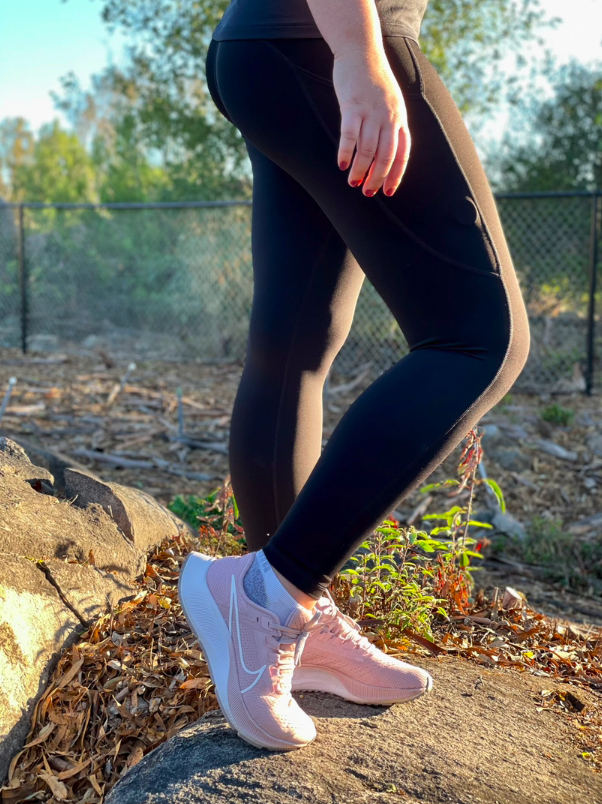
Bonus tip: Shoot during “golden hour” if you can. In my professional photography days, this was a sought-after time to shoot because the light becomes a golden color and is very flattering. Golden hour is the hour right before sunset or after sunrise if you want to give it a go!
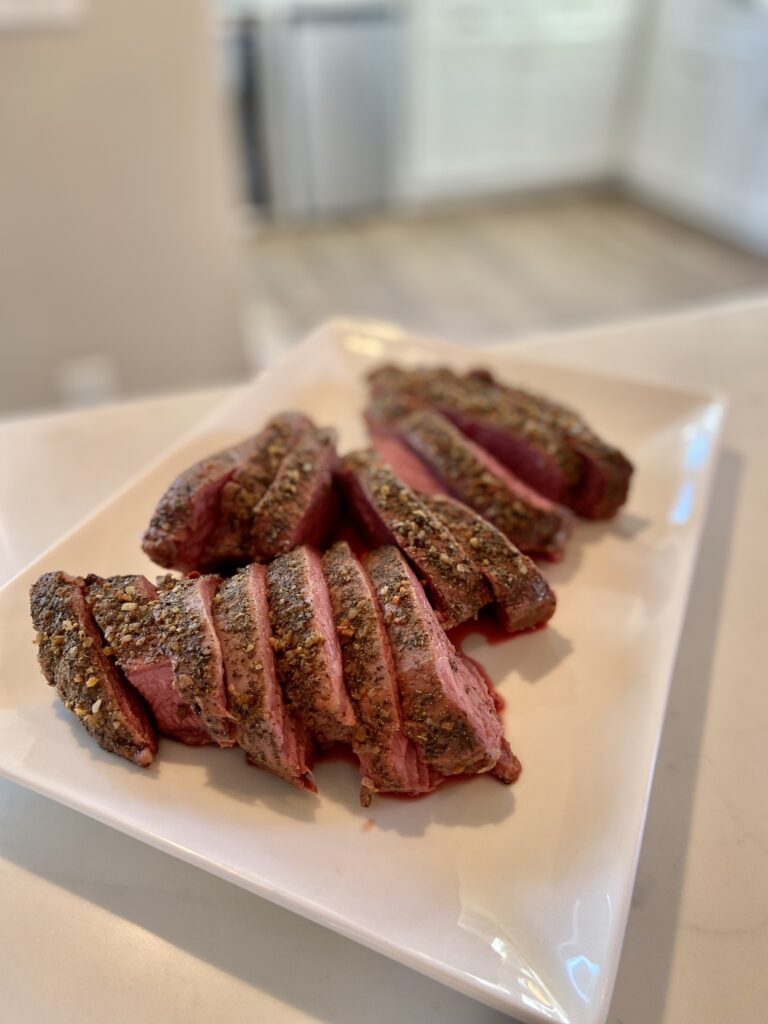
3. Keep the Photo Simple
Eliminate everything except for what matters to the photo. No cluttered backgrounds, nothing else in the frame.
4. Take a Bunch
Each unique photo counts, so take a variety of photos for each “scenario”. Then you can use “different” ones on different articles.
Don’t forget, these images work for social media as well!

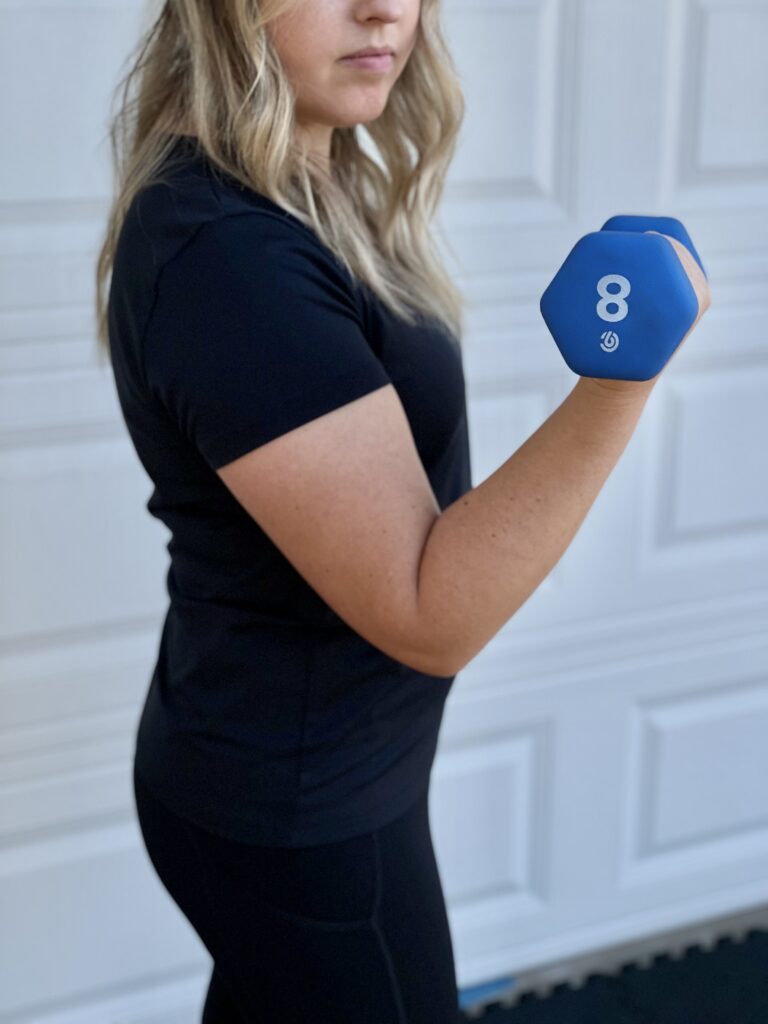
5. Include People
No, you don’t have to include your face. But include people – this SHOWS that you actually own the product, do the thing, etc.
Don’t take a picture of a hammer. Take a picture of a hand hammering.
Don’t take a picture of a blender. Take a picture of a hand pouring a smoothie from the blender.
Don’t have anyone? Use a tripod. It doesn’t add that much extra time, and you can crop the photo on your phone.
Or, hire someone. No, not a model. I’ve hired my 17 year old neighbor. I can crank out hundreds of photos in an hour, and I gave her $25. She was stoked.
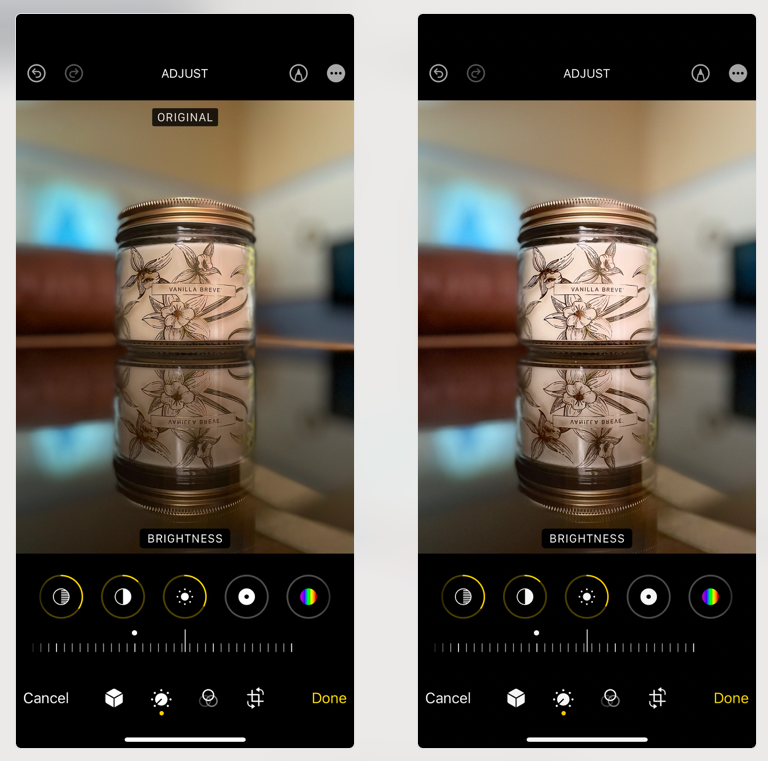
6. Apply a Quick Edit
Using your phone’s built-in editing app, lightly edit the photos.
Nothing crazy – I typically increase the exposure/ brightness, add some contrast, and call it a day. This makes the images “pop” and look more professional.
See below for a quick before an after that took me less than 30 seconds to do.
7. Don’t Overthink It
Just do it. Nike. Honestly, if you follow the 5 tips above, your picture will be better (to the user and Google) than any stock photo.
It probably won’t be Ansel Adams stuff. Which is just fine.
We Can Help
If you don’t want to bother, or don’t have time, or just don’t want to, we can help.
For starters, follow me on Twitter. From time to time, I share tips on how to take better photos.
Content + Custom Photos + Video
Piloted with Shawn Hill, we provide end-to-end product review services including expert (personalized) writing, professional photography, and professional video. The kind of stuff Google really really wants. Oh, and your readers too!
Website Made Easy Photography Course
We teach content creators how to create high-quality product photos using a DSLR and a smartphone. The course covers equipment, lighting, shooting techniques, photo composition, and the basics of product editing. Perfect if you want to start doing this yourself.