9 weeks into revitalizing this old, dormant Pinterest account, and we have liftoff.

Those are earnings from Raptive, and you can see the sharp increase in both traffic and revenue. Yes, I prefer to start with revenue graphs… because that is what matters at the end of the day.
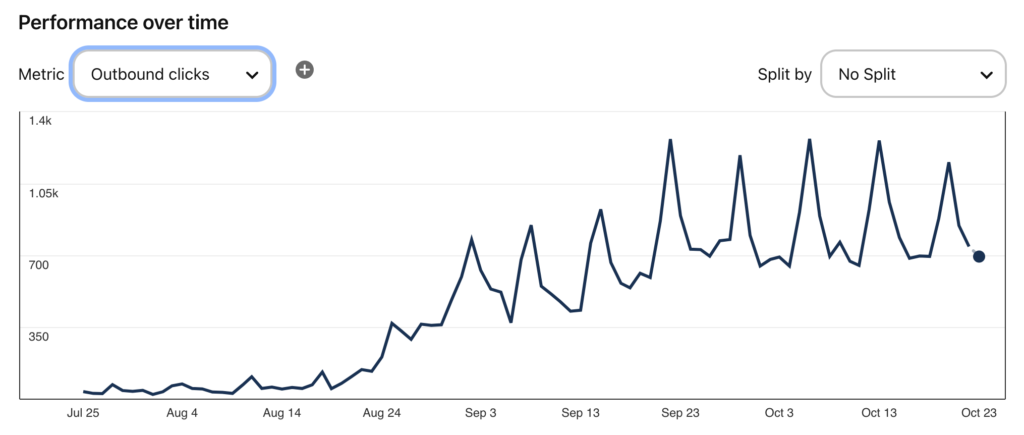
Here is the growth on Pinterest, measuring outbound clicks to our website:
What is our process? We follow Tony Hill’s methods more or less, which you can learn all about in his free Pinterest masterclass.
Let me go through it below!
Quick Navigation
Step 1: Keyword Research
Before we create any pins, we always start by researching keywords that actually matter for Pinterest. Hint… they are often very different from standard SEO keywords.
The key is to understand what people are actually searching for on Pinterest and which keywords are driving traffic to top-performing pins. By targeting the right keywords, you increase the chances of your content getting seen by more people.
We use PinClicks for this, following this process:
- Enter your main keyword into PinClicks. Let’s say you’re focusing on “easy DIY gardening tips.” Using the Keyword Research Tool, input that keyword (along with variations of it) into the search bar.
- Sort by Popularity to find the top pins that align with your keyword. This saves you hours of guesswork, helping you see what’s already resonating with your audience.
- Click “See Top Pins.” This feature allows you to analyze the top pins for your selected keyword, especially when you sort by Pin Score. You can click on each pin to analyze it, and each of these pins comes with annotated interests at the bottom—these are Pinterest’s official interests that boost relevancy and search visibility.
- Extract Keywords. Jot down 5 keywords that are frequently used in the highest-performing pins. These will become the backbone of your own pin descriptions and titles.
PinClicks now has the first-ever Pinterest rank tracking tool (Pro Plan), where you can track 25 keyword rankings, which makes my SEO brain oh so happy.
Step 2: Crafting Compelling Pin Titles and Descriptions
Once we’ve got our keywords, the next step is creating pin titles and descriptions that speak directly to our audience.
A strong title grabs attention, while the description explains the benefit of your content and encourages users to save the pin for later.
The trick here is to weave in relevant keywords naturally so your pins rank better in Pinterest’s search results.
Step 3: Designing Pins That Convert
When designing pins, consistency is key. We experiment with colors, fonts, and layouts while making sure to align with our brand’s visual identity.
Don’t be afraid to play with different formats—single image pins, text overlays, and collages can all work well, depending on your niche. The goal is to create pins that stand out and are easy to read at a glance.
For this account, we’ve made a good number of pivots. Seriously… don’t get married to designs. Work off of what is working and go “all in” on those designs.
Step 4: Tracking and Adjusting
After the pins are up, it’s all about tracking their performance and adjusting as needed. Keep an eye on which pins are driving the most clicks and engagement, and continue to refine your designs and keywords over time.
Again, every week, refine your process. Go after what is driving Impressions, Engagements, Clicks, and Saves!
If you’re ready to level up your Pinterest strategy, I recommend giving PinClicks a try. It simplifies keyword research, tracks your rankings, and helps you optimize your pins for better results. You can start with a free 5-day trial and see how much easier it makes your process.